
Initial Login
To configure your Fuzzball cluster for use, you must first log in. This section will guide you through the process of creating a Fuzzball context and an admin context that you can use to authenticate to your cluster.
For simplicity, you should carry out these steps on the server node hosting Fuzzball orchestrate. You can follow a similar procedure to add contexts and access your Fuzzball cluster from other machines later.
In an AWS deployment you need to set the cluster as your local K8s context to run the convenience script provided by CIQ (see below). For these steps to work, you must have the AWS CLI and the kubectl command installed locally. Check the AWS requirements documentation for more information.
To point your local K8s context to the Fuzzball stack that you just initialized, you need to run
aws eks update-kubeconfig with the appropriate parameters. You can find the command that you need
to run in the CloudFormation user interface. Go to CloudFormation and highlight the root Fuzzball
stack (i.e. the only one that is not listed as “nested”). Then highlight the “Outputs” tab as shown.
The appropriate AWS CLI command will appear in the outputs panel.
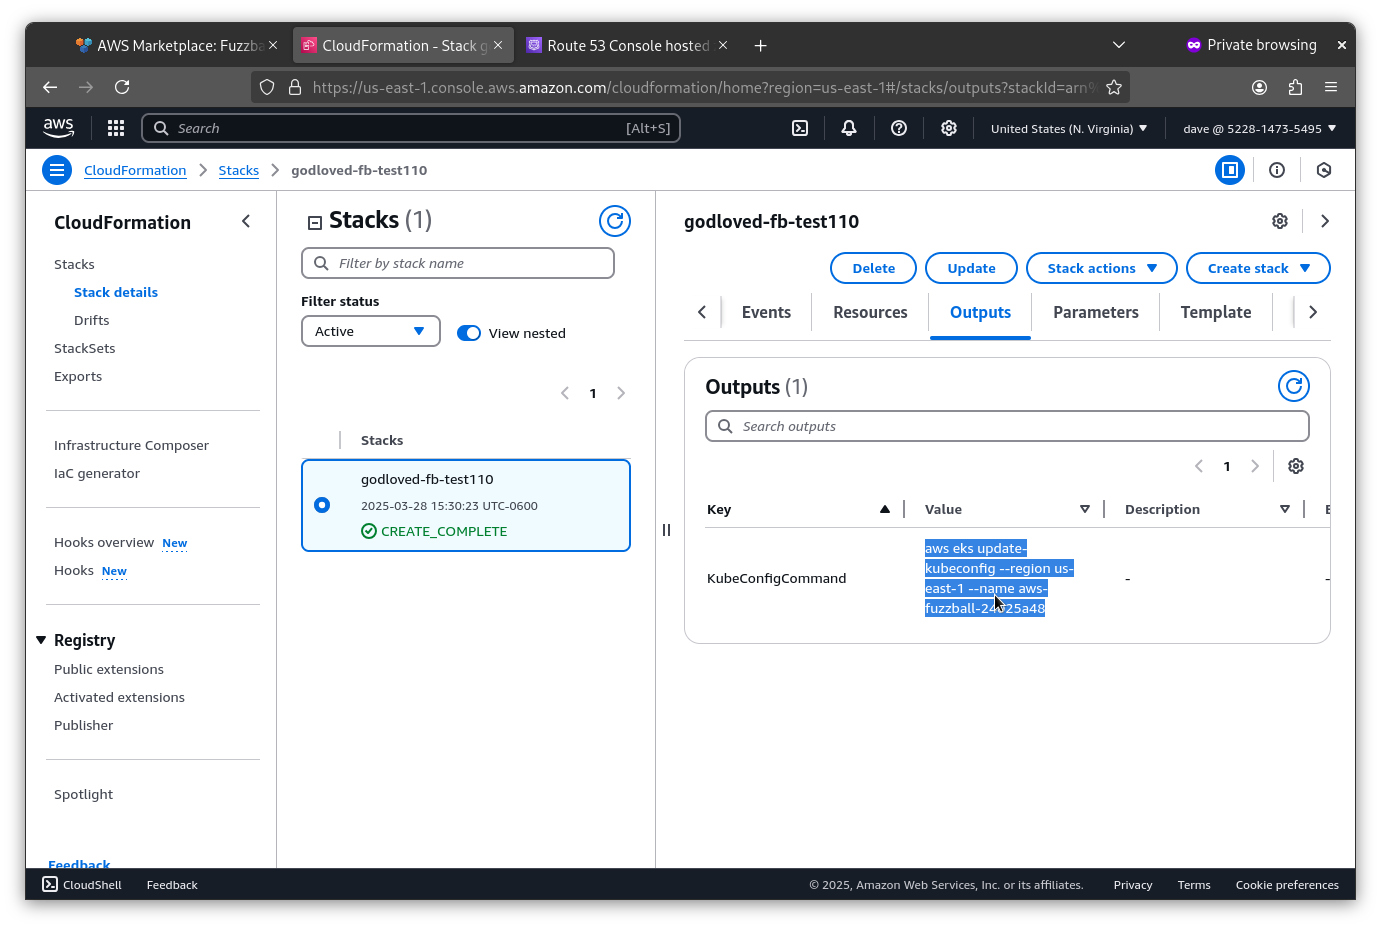
Simply copy and paste that command into your terminal.
$ aws eks update-kubeconfig --region us-east-1 --name aws-fuzzball-24025a48
Added new context arn:aws:eks:us-east-1:522814735495:cluster/aws-fuzzball-24025a48 to /home/godloved/.kube/config
Start by installing the Fuzzball CLI on your server node (or your local machine in the case of AWS) with the following commands:
# DEPOT_USER="" # populate with your username for CIQ Depot

# ACCESS_KEY="" # populate with the Depot key obtained from the CIQ sales/support team

# VERSION="3.2.0" # change to the proper version of Fuzzball as necessary
# dnf install -y https://depot.ciq.com/public/files/depot-client/depot/depot.x86_64.rpm
# depot register --user "${DEPOT_USER}" --token "${ACCESS_KEY}"
# depot enable fuzzball
# dnf install -y fuzzball-cli-${VERSION}-1The minimal Fuzzball configuration used in the on-prem deployment guide causes Fuzzball to be hosted with a self-signed certificate. Since self-signed certificates are not trusted by default, you have to make the CA certificate available to the CLI to avoid validation errors. There are two ways to do this.
You can skip this section in Cloud deployments or if you created a certificate when you performed the deployment.
This approach makes the certificate trusted system-wide for all tools, not just the Fuzzball CLI.
# kubectl get secret -n cert-manager root-ca-cert -o "jsonpath={.data['ca\.crt']}" | base64 --decode \
    >/etc/pki/ca-trust/source/anchors/fb_ca.crt

# update-ca-trust
When accessing a system with self-signed certificates, the procedure to accept this self-signed certificate should be repeated on other systems that will access the Fuzzball cluster and differs depending on the operating system.
Use the --ca-file flag or the FUZZBALL_CA_FILE environment variable to supply the CA certificate
to the Fuzzball CLI without modifying the system trust store. This is useful when you do not have
root access or are scripting across multiple clusters with different CAs.
# kubectl get secret -n cert-manager root-ca-cert -o "jsonpath={.data['ca\.crt']}" | base64 --decode \
    >/tmp/fuzzball-ca.crt

# export FUZZBALL_CA_FILE=/tmp/fuzzball-ca.crt
With FUZZBALL_CA_FILE set, all subsequent fuzzball commands in that shell session will trust the
specified CA automatically.
The--insecureflag disables TLS certificate verification entirely. It is intended only for development or testing environments and must not be used in production. If both--ca-fileand--insecureare set,--insecuretakes precedence and--ca-fileis ignored with a warning.
Now download and run the following script to view information about logging into your cluster:
# wget https://ciq-marketplace-assets.s3.us-east-1.amazonaws.com/public/fuzzball/scripts/deployment-info-wait.sh

# chmod +x deployment-info-wait.sh

# ./deployment-info-wait.sh

-------------------CLUSTER INFORMATION--------------------

Keycloak URL:     https://auth.10.1.96.99.nip.io/auth/realms/62c4aca0-7b38-4972-9300-7d17472a0fcc
Fuzzball API URL: https://api.10.1.96.99.nip.io
Fuzzball UI URL:  https://ui.10.1.96.99.nip.io
Fuzzball Admin UI URL: https://ui-admin.10.1.96.99.nip.io

Fuzzball admin account:
- username: user@domain.com
- password: fbpassword

Fuzzball cluster admin account:
- username: fuzzball-admin
- password: adminpassword

Keycloak admin account:
- username: keycloak
- password: keycloakpassword

To connect to Fuzzball:

-> $ fuzzball context create default api.10.1.96.99.nip.io https://auth.10.1.96.99.nip.io/auth/realms/\ 62c4aca0-7b38-4972-9300-7d17472a0fcc fuzzball-cli
-> $ fuzzball context use default
-> $ fuzzball context login --direct
You will need to log in to the admin context to set the provisioner configuration. And you will need to log in to the regular Fuzzball context to check the configuration is working as expected and to manage entities.
Use the information displayed by the script to create a Fuzzball context and an admin context and to
log into both. Using the example values above, the commands will look like the following. (Use the
values that were returned to you by the deployment-info-wait.sh script instead of the example
values demonstrated here.)
Note the single quotes around the passwords in the code block below. The default passwords set up by the Fuzzball CRD often have special characters that require single quotes.
# fuzzball context create default api.10.1.96.99.nip.io https://auth.10.1.96.99.nip.io/auth/realms/62c4aca0-7b38-4972-9300-7d17472a0fcc fuzzball-cli

# fuzzball context create admin api.10.1.96.149.nip.io

# fuzzball context login --direct -u user@domain.com -p 'fbpassword'

# fuzzball context login -u fuzzball-admin -p 'adminpassword'
The username and password for fuzzball context login --direct can also be provided more securely via the FUZZBALL_USER and FUZZBALL_PASSWORD environment variables.
If you belong to more than one group on the cluster you can drop into a specific group as part of
the login itself with --group/-g. The flag accepts the group’s name or UUID, and is also
honored on the device-grant (fuzzball context login) and direct-grant (--direct) flows:
# fuzzball context login --direct -u user@domain.com -p 'fbpassword' --group SA
Logging into current cluster context...
Group "SA" in use
Without --group, login activates your default group (if one is configured) or falls back to your
personal User Account group. You can change the active group at any time after logging in with
fuzzball group use <NAME-OR-ID>.
Every deployment creates a Fuzzball Local organization with a fuzzball-admin@local user who is the
cluster’s initial cluster admin. To log in, create a context using local as the authentication
method instead of a Keycloak realm URL:
# fuzzball context create fuzzball-local api.10.1.96.99.nip.io local fuzzball-cli
Configuration for "fuzzball-local" created.
Configuration for "fuzzball-local" now in use.

# fuzzball context login -u fuzzball-admin@local -p 'adminpassword'
Logging into current cluster context...
Group "fuzzball-admin@local" in use
See Initial Entity Management for more information about local users and how they differ from Keycloak users.
Now that you are logged into your Fuzzball cluster, you can proceed to creating an initial basic provisioner configuration.